1. Introduction
Getting the elbow radius wrong is one of the most avoidable causes of rework in piping projects. A miscalculated centerline radius can throw off a prefabricated spool by inches, forcing field cutting, extra welding, or a delayed installation. Yet many teams still treat CLR as a minor detail instead of a core layout dimension.
This guide explains what centerline radius (CLR) actually means, how it differs from center-to-face, how to calculate it correctly, and how to choose between long radius and short radius elbows for your application. Whether you’re drafting a piping isometric, fabricating spools, or verifying a supplier’s dimensions, this article gives you a practical, standards-based approach.
2. What Is Pipe Elbow Centerline Radius?
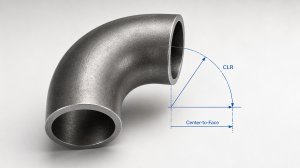
Centerline radius (CLR) is the distance from the center point of an elbow’s curvature to the centerline of the pipe running through it. In simple terms, it describes how “tight” or “gradual” a bend is.
CLR is usually expressed in two ways:
- As a direct dimension (inches or millimeters)
- As a multiple of the pipe diameter, written as “D” — for example, 1D or 1.5D
A 1.5D elbow on a 4-inch pipe has a 6-inch centerline radius. This D-multiplier format is widely used because it lets engineers and buyers compare radius sizes across different pipe diameters without recalculating dimensions every time.
2.1 CLR vs. Center-to-Face Dimension
CLR and center-to-face are related but not the same measurement, and mixing them up is a common source of layout errors.
- CLR is the radius of the bend’s arc, measured to the pipe centerline.
- Center-to-face is the distance from the theoretical center point of the bend to the actual end face of the fitting.
For a 90-degree elbow, center-to-face happens to equal the CLR, because the bend forms exactly one quarter of a circle. But for a 45-degree elbow, the two values are different — center-to-face is shorter than the CLR because the fitting only sweeps through half the angle. Always confirm which dimension a drawing or supplier catalog is referencing before using it for cut-length calculations.
2.2 CLR vs. Throat Radius
Throat radius refers to the radius of the inside curve of the elbow — the tightest part of the bend, on the inner wall. It’s a manufacturing and flow-related dimension, not the one used for layout.
CLR is the reference point used for piping design and fabrication because it stays consistent regardless of pipe wall thickness. Throat radius, by contrast, can vary slightly with wall thickness and is more relevant to internal flow behavior than external layout dimensions.
3.Types of Pipe Elbow Radius
Before calculating anything, you need to know which type of elbow you’re working with. The radius classification changes both the dimension and the expected flow performance.
3.1 Long Radius Elbows
Long radius (LR) elbows typically use a 1.5D centerline radius. This is the most common standard for industrial piping because it balances smooth flow with reasonable installation footprint.
Advantages:
- Smoother directional change, lower turbulence
- Lower pressure drop across the fitting
- Better suited to high-velocity or high-flow systems
- Preferred for larger pipe sizes
3.2 Short Radius Elbows
Short radius (SR) elbows use a centerline radius equal to the pipe diameter, or 1D. They’re more compact but come with trade-offs.
Advantages:
- Smaller footprint for tight installations
- Lower material and cost per fitting
- Adequate for lower-velocity, less demanding systems
Trade-off: higher pressure drop and more turbulence compared with long radius elbows of the same size.
3.3 Tight Radius and Sweeping Bends
Some projects call for radii outside the standard 1D/1.5D range:
- Tight radius bends (less than 1D) are used when clearance is extremely limited, such as routing around existing structural members or equipment.
- Sweeping or loose radius bends (greater than 1.5D) are used when flow efficiency is the priority and space isn’t a constraint — common in custom mandrel-bent tube rather than standard cast or forged fittings.
| Radius Type | Typical CLR | Best For |
|---|---|---|
| Short Radius | 1D | Tight spaces, lower-flow systems |
| Long Radius | 1.5D | Industrial systems, higher flow, lower pressure drop |
| Sweeping/Loose Radius | >1.5D | Custom bends prioritizing flow over footprint |
4. How to Calculate Pipe Elbow Centerline Radius
Once you know the elbow type, the calculation itself is straightforward — but it depends on getting the right inputs first.
Step 1: Confirm the diameter basis. Determine whether the specification uses nominal pipe size (NPS) or actual outside diameter (OD). These are not always the same number, especially for smaller pipe sizes, and using the wrong one will throw off every downstream calculation.
Step 2: Confirm the radius multiplier. Check the drawing, standard, or supplier spec sheet for whether the fitting is 1D, 1.5D, or a custom radius.
Step 3: Calculate CLR.
CLR = Diameter basis × Radius multiplier
For example, a long radius elbow on 4-inch nominal pipe: 4 × 1.5 = 6-inch CLR.
Step 4: Apply the elbow angle to get center-to-face. For non-90-degree elbows, center-to-face is derived from CLR and the bend angle:
Center-to-Face = CLR × tan(angle ÷ 2)
For a 45-degree elbow with a 6-inch CLR: 6 × tan(22.5°) ≈ 2.49 inches.
Step 5: Verify against the manufacturer’s dimension table. Formulas give you the theoretical value, but manufacturing tolerances and standard dimension tables (such as ASME B16.9 for butt-weld fittings) are the final authority for production work. Don’t cut pipe based on a hand calculation alone if a verified dimension table is available.
Example Calculation Workflow
- Identify pipe size and applicable fitting standard.
- Confirm the elbow is long radius, short radius, or custom.
- Calculate CLR using the diameter and multiplier.
- Apply the elbow angle to find center-to-face if needed.
- Cross-check the result against the supplier’s dimension sheet before fabrication.
This sequence prevents the most common error: calculating a theoretically correct number that doesn’t match what the actual fitting on the shelf will give you.
5. How to Measure CLR on an Existing Pipe Bend
Sometimes you’re working without a drawing — repairing an old system, reverse-engineering a fitting, or verifying a custom bend. In these cases, physical measurement is necessary.
Useful tools include a tape measure, calipers, an angle finder, and a radius gauge. The key is measuring from known tangent points and the pipe centerline, not just the visible curve of the pipe wall — measuring only the inside or outside edge of the bend will give you a skewed result.
5.1 Measuring Elbows With Tangent Legs
Mandrel-bent tube and custom fabricated bends often include straight sections (tangent legs) before and after the curve. When measuring these:
- Record the tangent leg lengths separately from the CLR.
- Identify the true bend start and end points before measuring the arc.
- Confirm both the bend angle and CLR before ordering a replacement or matching part — leg length errors are just as disruptive as radius errors.
6.Why Elbow Radius Matters in Piping Design
The radius you choose affects far more than the fitting’s shape — it influences flow performance, layout space, and long-term system reliability.
6.1 Flow and Pressure Drop
Long radius elbows create a more gradual change in flow direction, which reduces turbulence and pressure loss. Short radius elbows change direction more abruptly, increasing resistance. For systems with high flow rates, tight pressure budgets, or abrasive media, this difference can affect pump sizing and energy costs over the system’s lifetime.
6.2 Space and Routing Constraints
In practice, available space often overrides the “ideal” flow choice. A congested mechanical room or skid may only have room for short radius or tight radius elbows, even if a long radius fitting would perform better. Most real piping layouts use a mix of radius types depending on where clearance allows it.
7. How to Choose the Right Pipe Elbow Radius
Selecting the correct elbow radius comes down to balancing flow performance against physical constraints:
- Pipe size, pressure rating, and material
- Fluid velocity and acceptable pressure drop
- Available installation space and routing complexity
- Compatibility with connected flanges, valves, and prefabricated spools
7.1 When to Choose a Long Radius Elbow
- High-velocity or high-flow piping systems
- Applications where minimizing pressure drop matters
- Layouts with sufficient space for a gradual bend
- Systems where reduced turbulence extends component life
7.2 When to Choose a Short Radius Elbow
- Compact equipment skids or congested mechanical rooms
- Lower-flow applications where the pressure drop difference is negligible
- Retrofit projects where existing structures limit routing
- Situations where footprint matters more than optimum flow efficiency
8.Common Pipe Elbow Calculation Mistakes
Even experienced teams run into the same handful of errors:
- Confusing nominal pipe size with actual outside diameter
- Mixing long radius and short radius dimensions on the same layout
- Treating CLR and center-to-face as interchangeable
- Forgetting to factor in elbow angle for non-90-degree fittings
- Relying on theoretical formulas without checking supplier tolerances
- Overlooking tangent legs, weld gaps, or bevel allowances in cut-length planning
Most of these mistakes come down to unclear communication between design, procurement, and fabrication — catching them early avoids costly field corrections.
9.Practical Checklist Before Fabrication or Installation
- Confirm pipe size, schedule, material, and applicable fitting standard
- Verify the elbow angle and radius classification (LR, SR, or custom)
- Check CLR, center-to-face, tangent length, and end preparation
- Review manufacturer dimension tables and tolerances
- Confirm spool dimensions in CAD or with a physical layout check
- Make sure design, procurement, and fabrication teams are using the same dimension basis
10.FAQ
It means the elbow’s centerline radius equals 1.5 times the pipe’s nominal diameter or outside diameter, depending on which basis the specification uses. It’s the standard designation for long radius elbows.
Not always. They’re equal for 90-degree elbows but different for other angles, since center-to-face depends on both the CLR and the bend angle.
Multiply the CLR by the tangent of half the bend angle: Center-to-Face = CLR × tan(22.5°) for a 45-degree elbow.
Check the applicable standard or supplier spec sheet first — most standard fittings use nominal pipe size, but always confirm rather than assume.
Yes. Long radius elbows generally produce lower pressure drop and turbulence than short radius elbows of the same size.
The geometric calculation applies across materials, but wall thickness, flexibility, and manufacturing tolerances can vary. Always confirm dimensions against the manufacturer’s data for the specific material and standard you’re using.
Formulas give theoretical values. Actual fittings can have small manufacturing variations, and different standards define dimensions slightly differently — verifying against the data sheet prevents mismatches during assembly.
11. Conclusion
Accurate CLR calculation starts with two decisions: identifying the correct diameter basis and confirming the radius multiplier for your elbow type. From there, applying the elbow angle gets you to a usable center-to-face dimension — but the final check should always be the manufacturer’s dimension table, not just the formula.
Long radius and short radius elbows each have a place depending on your flow requirements and available space, and most real-world layouts use a combination of both. Getting this right before fabrication saves rework, reduces material waste, and keeps installation schedules on track. If you’re sourcing elbows for an upcoming project, confirm the radius type and dimension basis with your supplier before finalizing your piping isometrics.